Easily make your own borax crystal ornaments for Christmas this year. They only require two ingredients and they turn out shiny, sparkly, and gorgeous. These borax crystal ornaments make awe-inspiring homemade gifts for friends and neighbors. Plus, the kids can do a fun winter science experiment and learn about chemistry as they grow their very own stunning crystals.
Last year we made an adorable snowy snowman using this same process. He makes a shiny little holiday decoration as well!
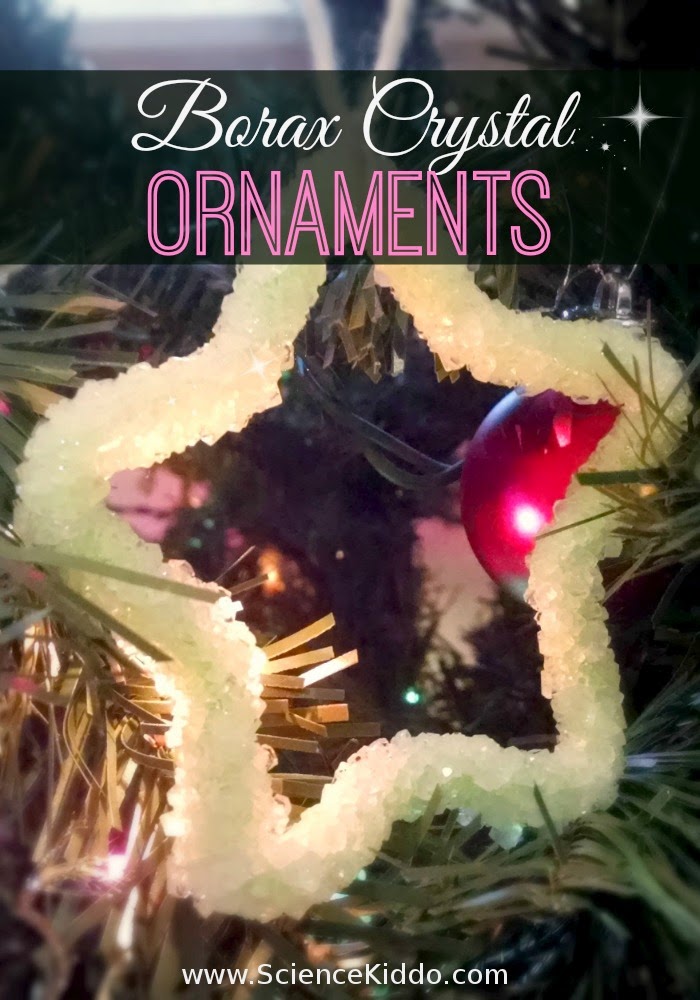
Make Borax Crystal Ornaments
*This post contains affiliate links. Please see our disclosure policy.
Materials
Pipe Cleaners – These sparkly tinsel stems would be perfect for the holidays.
Festive Cookie Cutters – Keep these around to make squishy Christmas window gels, too!
String
Pencil
Mug, vase, or jar
Boiling Water
Borax – This is an inexpensive ingredient in so many of our science experiments. Make slime, a borax crystal snowman, or borax crystal nature ornaments with the leftovers!
Directions
- Bend your pipe cleaner into your desired shape. We did this by using cookie cutters as a guide as seen below.

- Tie a piece of string to your pipe cleaner shape. You can use string, yarn, or even dental floss if you want!
- Attach the string to a pencil, pen, spoon, or other long object and set aside.
- Fill your jar or vase with boiling water. Add 3 Tablespoons of borax per cup of water and stir. It’s okay if some borax settles on the bottom of your container.
- Lower your pipe cleaner shape into the hot water/borax mixture. Make sure it is not touching the sides or the bottom of your container, and that you can get it through the mouth of your container easily. Feel free to trim or bend your shape accordingly. It is fine to have two ornaments in one large container just as long as they don’t touch.

- Make sure your jar is in a quiet place where it won’t be disturbed. You don’t want it to get jostled or bumped at all while the crystals are growing.
- After a couple of hours you will start to see crystals growing! Leave your mixture overnight for best results, or remove your ornaments after just a few hours if you just want a light dusting of crystals.
- Let your borax crystal ornaments dry on a paper towel for an hour or so. Then pick it up and admire it in the sunlight. Seriously, the crystals are intricate and gorgeous. You will want to grab a magnifying glass to observe them more closely!
The thing I was most surprised at is how sturdy these are! I thought they would be delicate and fragile, but they are deceptively hardy. Also, they look edible, but they aren’t. I even found myself tempted to gnaw on them. Don’t do it.

The Science of Growing Borax Crystals
Crystal science is amazing. The word crystal actually refers to any material that is arranged in an ordered form. Some crystals (like borax) are arranged into little cubes. Other crystals (like snowflakes) have six different arms. You can grow crystals from many substances including salt, sugar, epsom salt, baking soda, and borax. In most of my undergrad chemistry labs the last step was to crystallize the product so we could weigh it. I’ll tell you, though, these borax crystals are much easier to grow than most of the substances we had to grow in my lab, and they are more beautiful, too!

I love the way these ornaments reflect the light on our tree. The crystals give the shapes a delicate frosty look.


Kid-Approved Dino Game from Suzy Homeschooler
I love, love, love, the star shaped one! Bonus! I already have that cookie cutter. Thanks for sharing your idea!
Awesome! Thanks for visiting 🙂
LOVE these! Thanks for linking up at #made4kids! I love how simple these and few ingredients these require. We have the ingredients on hand. My son will love making these.
What a CLEVER way to make a star shape – I have just had one of those AH HA moments!!
This is so awesome! Our kids will enjoy making these! Sharing!
These look like so much fun to make! I think my children will enjoy making these this year. Thanks for sharing at the #Made4Kids Link Party!
These are so pretty! I love the ice look on the Christmas tree. Thanks for sharing at the Thoughtful Spot!
That is so neat!! Very clever! Thanks for sharing on Toddler Fun Friday! Pinning now so I can do later with my kiddos!
I woke up this morning to find some great crystals. Unfortunately, there are crystals growing on the bottom of the jar, too. How do I remove those crystals?
Soaking the jar in hot water will do the trick. You may have to refill the jar with fresh hot water a few times, depending on how thick the crystals are. I’m so glad you got some good ones!
Borax is a poison used to kill pests and can be absorbed through the skin. Borax in slime is combined with other compounds (glue) to neutralize some of the exposure. If you read the borax box it indicates that you should not handle the Borax directly. It indicates that contact can have an adverse effect on children and their hormones – now what exposure that is needed, I do not know. Ingestion causes nausea and vomiting. Hmmm touching borax then touching my mouth…. Borax while easy for teachers to get, easy to use, needs to be used with precautions.
Absolutely! As with anything that is potentially toxic, care needs to be used to ensure that babies and young children don’t ingest it and that older kids wash their hands after handling it. However, it is often used as a safe and natural household cleaner and detergent. I even washed my hands with it back in junior high school because it’s the only soap the school provided in the bathrooms and locker rooms! So yes, make sure the kids don’t eat it and that they wash their hands, but there shouldn’t be much of a concern past that.
This looks like such an awesome activity. How long does it take for the whole pipe cleaner to have crystals? just curious.
I usually leave it overnight for strong, dense crystals. If you want crystals that are less dense you could just leave it for 4-6 hours. If you use a clear container you can see the crystals form and remove the ornament whenever you want.
can these be preserved somehow ?
Yes, the crystals are very strong and hardy. I would suggest placing the ornament in a plastic baggie, sealing it, and then padding it will something soft to prevent it from breaking.
I love these I used to make them years ago my daughter and I enjoyed our time together she even made a bicycle once it allows kids to be creative now I get to enjoy with my grandson thank you for the recipe I couldn’t remember
Do you have to use a jar or can you use a styrofoam cup? I’m not sure I can round up 90 jars!
You should be able to do it in any kind of container as long as it’s big enough!
Could you add food coloring to the water for cured crystals?
Yes, you can! You have to use quite a bit of food coloring, though. If you use a white pipe cleaner and color the borax solution that should come out beautifully.
Colored Crystal’s. Not cured. Auticorrect……..
Two ?’s 1. What do you use for coloring and in what amounts? Ordinary food coloring? 2. To save them could I use spray on varnish, shellac, or sealer of that type?
Food coloring or liquid watercolors should both work. I think you need to use quite a bit of coloring in the borax. You can experiment and see what works!
The crystals are actually pretty sturdy. We have saved our ornaments year after year and they flake off a little, but they hold up pretty well. Some kind of sealer would certainly be worth a try!
Can you reuse the same solution or do you have to make new batch each time?
You need to make a new batch each time.